Guideline to publish APIs
On this page
- What is API.NSW
- Creating an API provider account
- Access your API provider account
- Publishing an API
- Access your API
- Testing your API
What is API.NSW
API.NSW enables you to quickly expose backend services as APIs. You do this by creating an API and providing details of the endpoints to be exposed.
The API decouples your backend service implementation from what subscribers consume, protecting them from future changes to your backend services. So while you update backend services, subscribers are insulated from those changes and can continue using your API.
Creating an API provider account
You need to start by requesting to be an API provider in order to publish your APIs on the API.NSW website.
- Request to be an API provider.
- Our team will contact you to gain further understaning for this request
Once you have been approved to host your APIs, sign up for an account.
Access your API provider account
You can access your account once you have been approved to provide APIs on API.NSW.
To access your account:
- Navigate to API.NSW Login page.
- Enter your email address
- Click 'Continue' to obtain a verification code.
- Check your email to obtain the six-digit security code from API.NSW.
- Enter the six-digit security code in the verify code page.
- Click the 'Verify' button
Once successfully logged in, you will land on ‘My apps’ page.
Publishing an API
You can publish APIs from your API provider account.
Click on 'Publish new API' button in the side menu to start publishing your API:
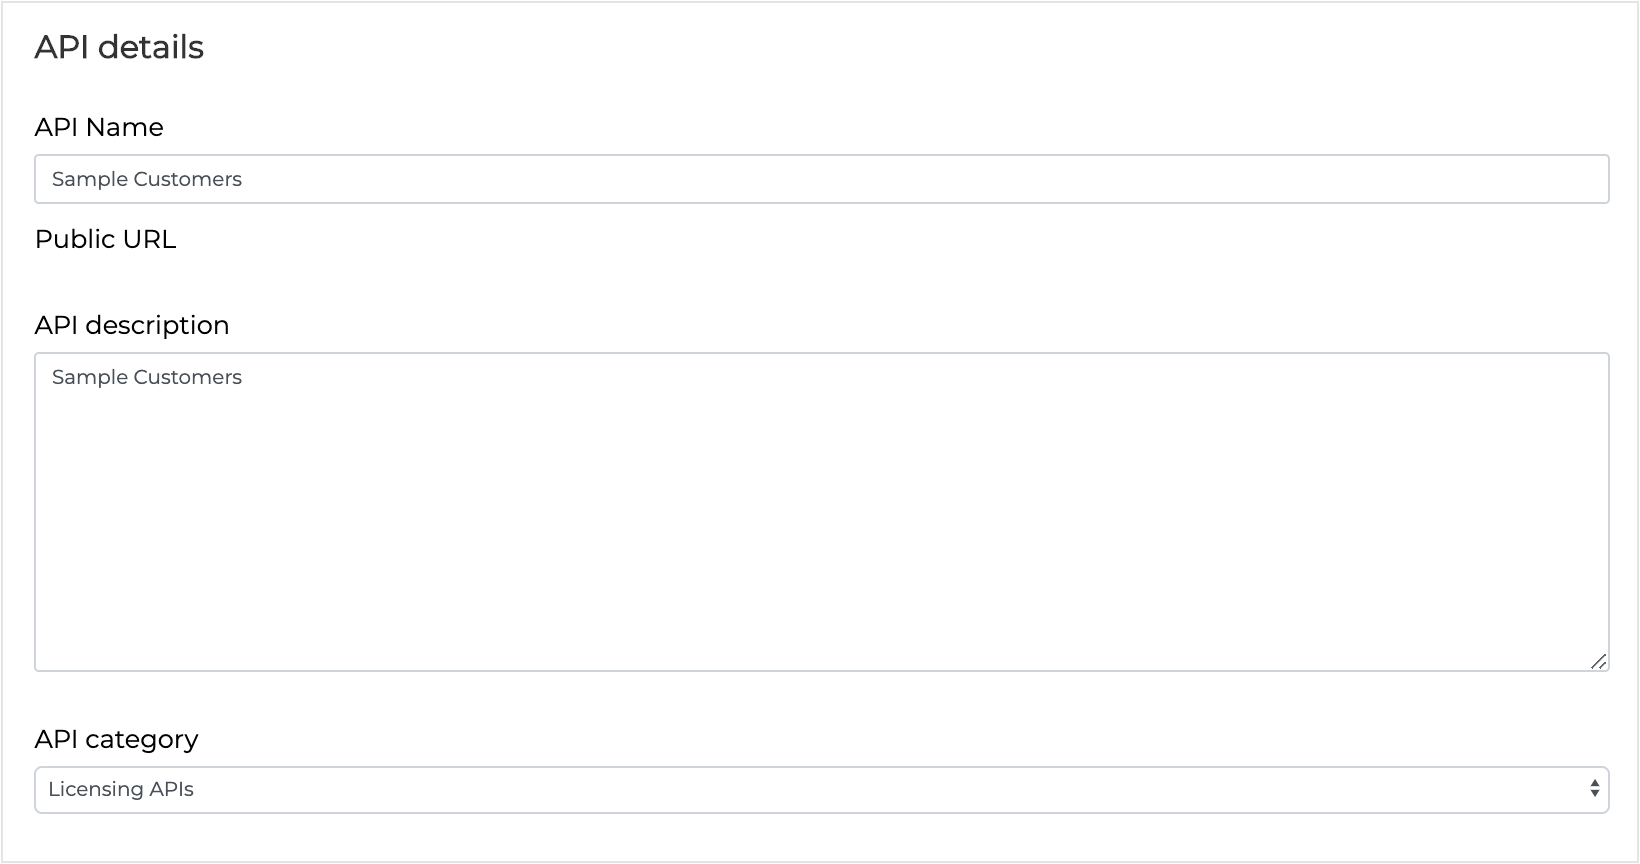
Enter API Details
- API name - Provide a unique name for the API. The name is the key identifier of the API and therefore must be unique.
- API Description - Provide a brief description of the API. Ensure that you adequately describe the purpose of the API as this will be used to inform users when they are subscribing to your API.
- API Category - Select an appropriate category for the API as this is the category the API will appear under in the 'API categories' page of API.NSW. If the appropriate category is not available please use 'Licensing APIs' in order to create your API and in parallel raise a support ticket from the support page in API.NSW for the new category.
Enter API Call Quota
API Quota - Enter the amount of API free calls per month you wish to allow a user to make. You can enter an amount between 1 - 1,000,000.

Enter Target URL
Target URL - Enter the target URL of the backend service that this API invokes.

Enter public base path
Public base path - Starting with a forward slash, enter the public base path that defines your API. This will be shown on the public URL.

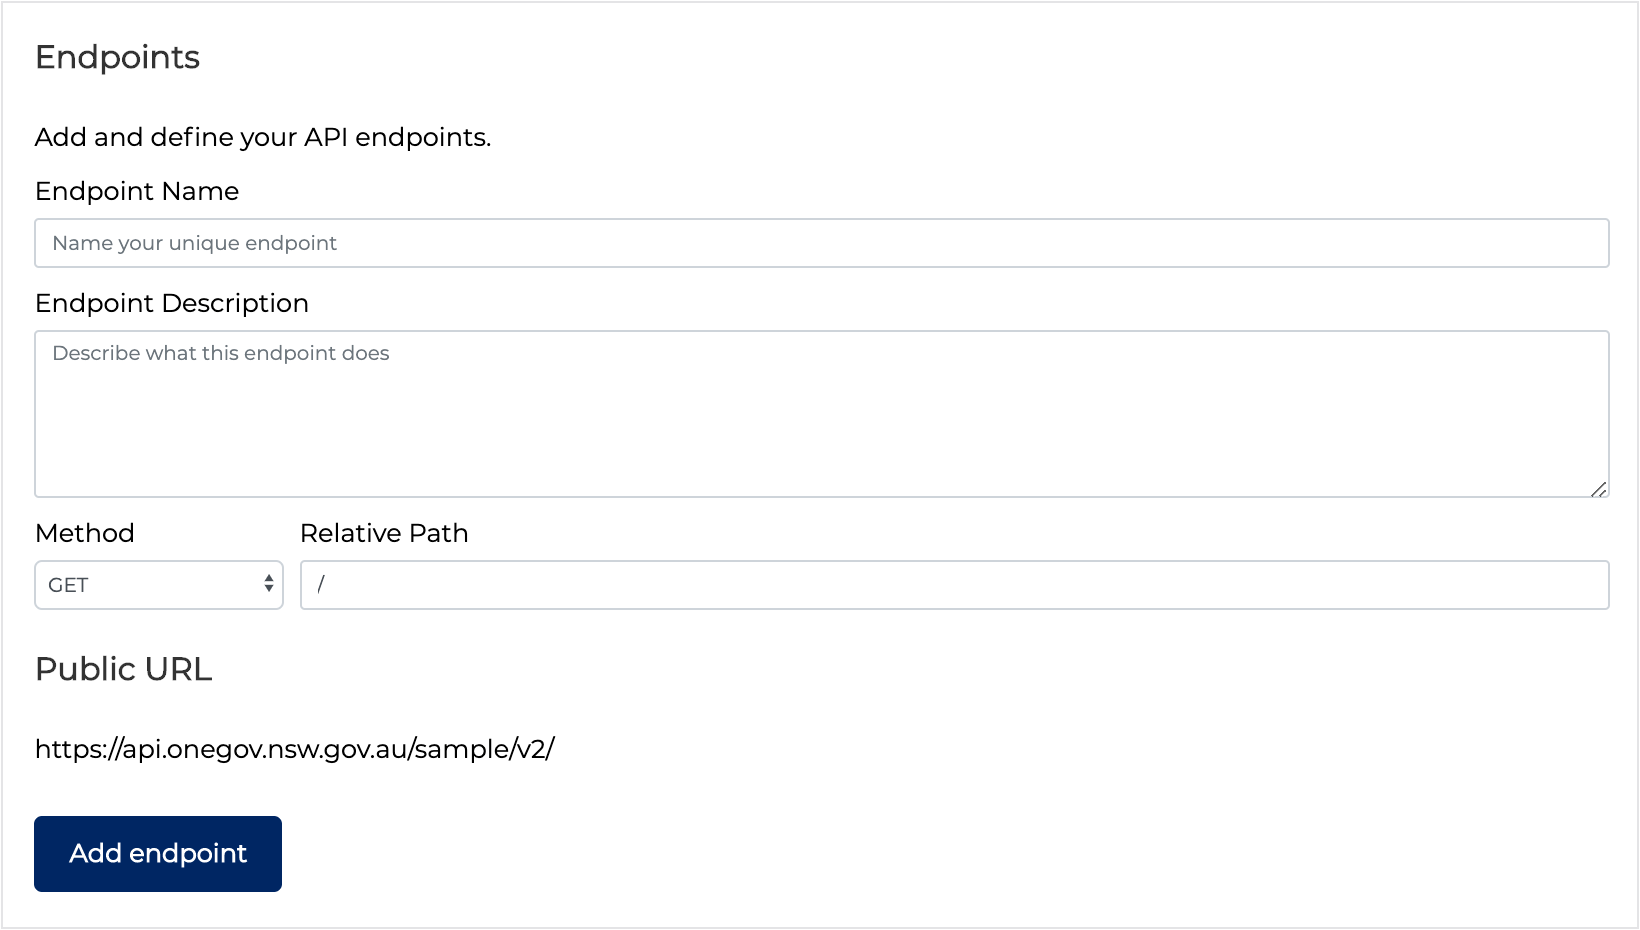
Enter Endpoints
Provide all the endpoints that you would like to expose for the API. You can create an endpoint by providing the relevant details then clicking on ‘add endpoint’ button.
- Endpoint Name - A unique name for the endpoint.
- Endpoint Description - A brief description of the endpoint. It's important to clearly explain the purpose of the endpoint as this description is shown in the API details page.
- Method - The verb that indicates the interactions with the resource.
- Relative Path - Provide the relative path to the endpoint which is made up of the target URL and the base path.
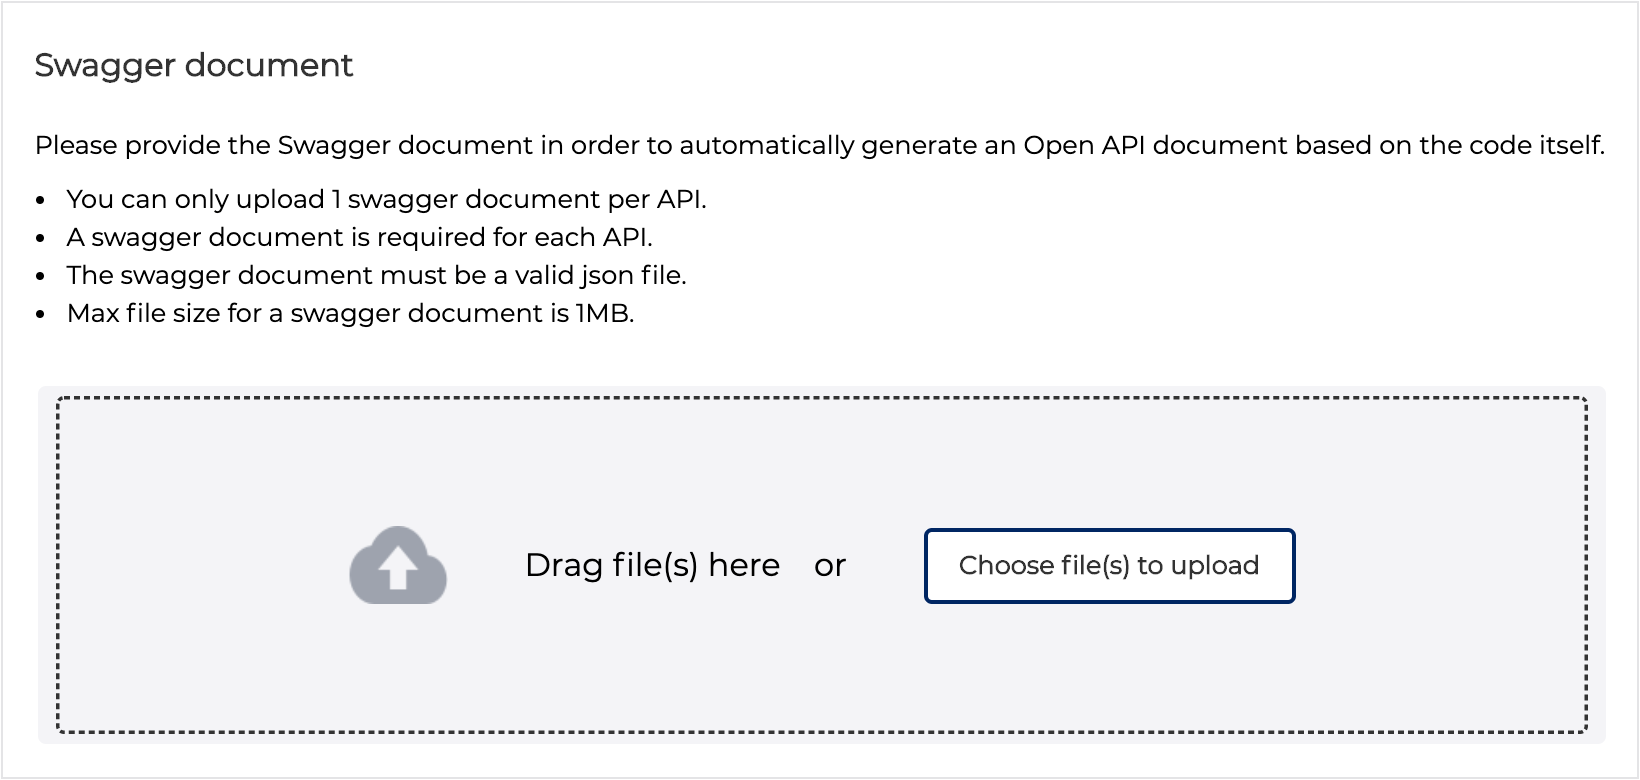
Publish a Swagger Document
A swagger document is required when publishing an API. If you are not sure where to start, we recommend using Swagger Editor to develop a swagger document. Once uploaded, all swagger documents are validated against swagger version 2.0.
Only one swagger document can be published against a single API but you can update the swagger document as your API develops and evolves.
You can download our sample swagger document and instructions on how to use it as referenced below.
insert_drive_file
The easiest way to publish a swagger document with your API is to drag and drop the swagger document.
- Ensure the swagger document panel is visible in your browser.
- Navigate to the swagger document on your local machine.
- Drag the swagger document over the swagger document panel and drop.
Alternatively, use the ‘Choose file(s) to upload’ button.
- Ensure the swagger document panel is visible in your browser.
- Navigate to the swagger document on your local machine.
- Click 'Open'
Provide a Logo
Providing a logo is an optional step but is crucial if you want developers to recoginise your APIs. The easiest way to upload a logo is to drag and drop the logo file.
- Ensure the logo 'Drag and drop' box is visible in your browser.
- Navigate to the logo file on your local machine.
- Drag the swagger document over to the swagger document ‘Drag and drop’ box and drop.
Alternatively, use the ‘Choose file(s) to upload’ button.
- Ensure the logo 'Drag and drop' box is visible in your browser.
- Navigate to the logo file on your local machine.
- Click 'Open'
Save your API
You can save your API once you have provided all the required details and files. By default, saving your API at this point keeps your API privately visible to you, so you can continue to develop it to be ready for public consumption.
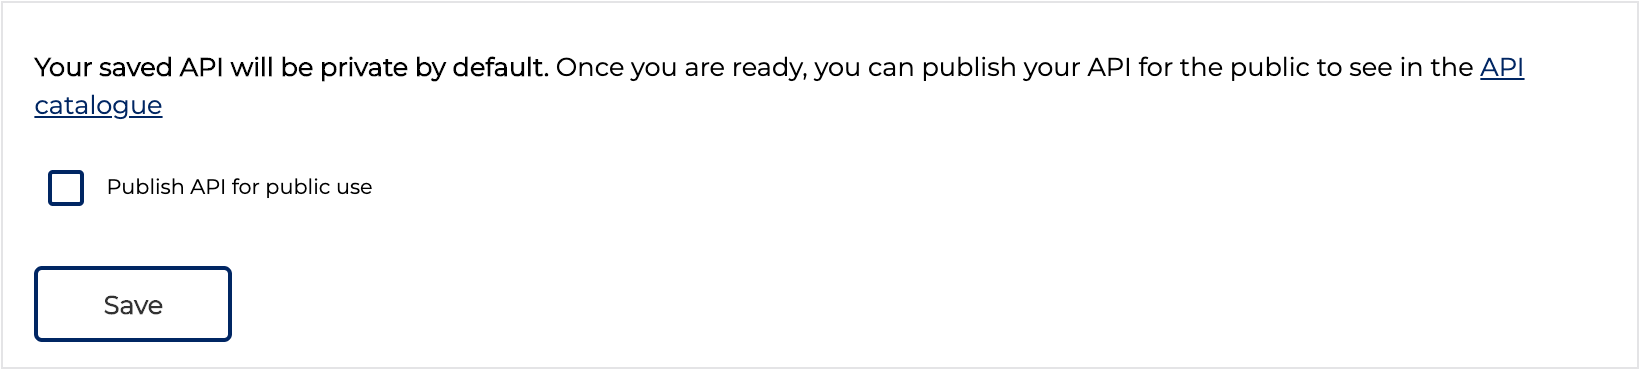
Publish your API
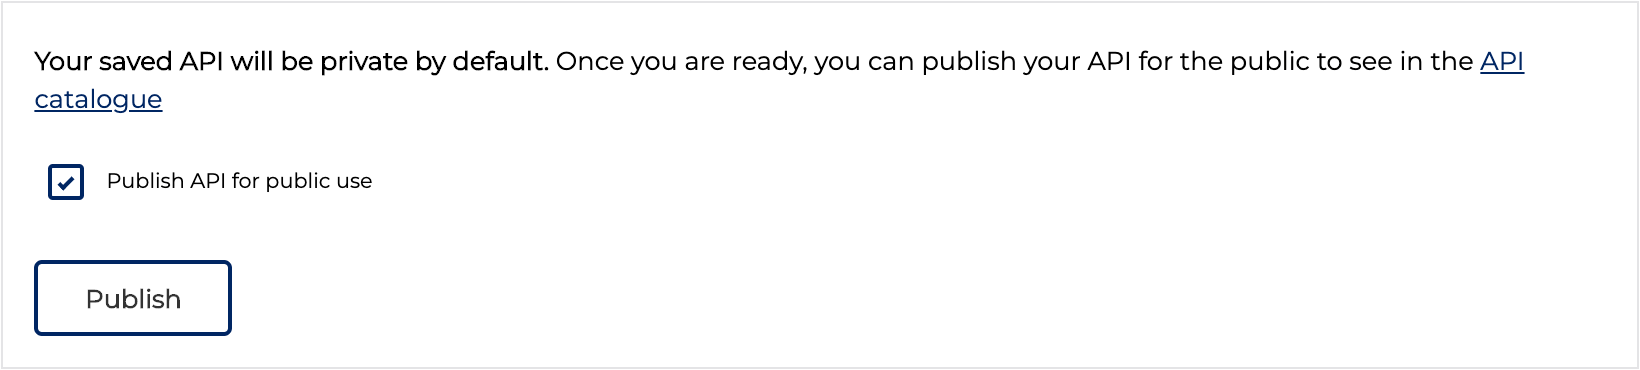
When you are ready to share your API, tick the ‘Publish API for public use’ checkbox and click on ‘Publish API’ button. This will now show your amazing API in the API Catalogue.
If you want make your API private for any reason, you can un-publish an API by simply unchecking ‘Publish API for public use’ and clicking on the ‘Save’ button. Existing consumers will still be able to consume you API in it’s last published state.
Access your API
You can access all your existing APIs from your API provider account. To access your account:
- Navigate to API.NSW Login page.
- Enter your email address
- Click the 'Continue' button to obtain a verification code.
- Check your email inbox for an email from API.NSW containing a six-digit security code.
- Enter the six-digit securty code in the verify code page.
- Click the 'Verify' button
Once successfully logged in, you will land on the ‘My APIs’ page. To view or edit any existing APIs:
- Navigate to your APIs via the menu on the right hand side of the screen.
- Click on the 'edit' button.
Testing your API
Access your test app
Once you have saved your API, it is ready to be tested and therefore we have automatically generated a test app of your API that is visible only to you as the publisher.
The naming convention of the test app is: (App Name)-Test App
App Name - is the name that you provided for the corresponding API.
To access your new test app for your new API:
- Click the 'My Apps' link in the navigation menu at the top of the screen
- Click on '(App Name)-Test App' which is located on the overview screen or alternatively you can access it through the 'My apps' menu on the right of the screen.
Key Information
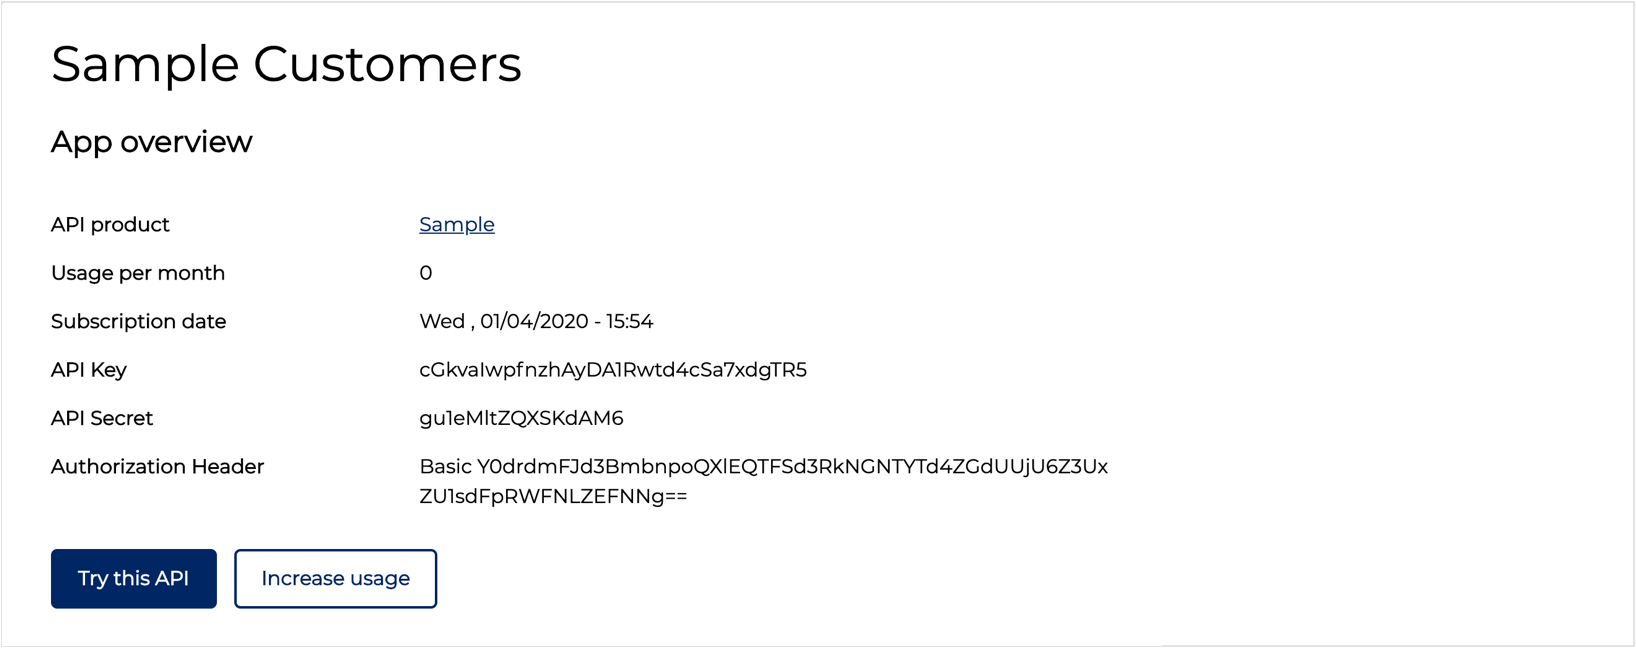
Once you are inside your test app, You will find key information that is required when testing the app.
API key - is used to track and control how the API is being used. The API key often acts as
both a unique identifier and a secret token for authentication.
API Secret - is used for authentication in the most critical parts of the system where
access should be limited.
Authorisation - is the authentication credentials to access your API and is Base64 encoded.
View Your API
When you are ready to test your API, click on the 'Try this API' button on the test app screen. The API details page will open in a new tab within your browser.
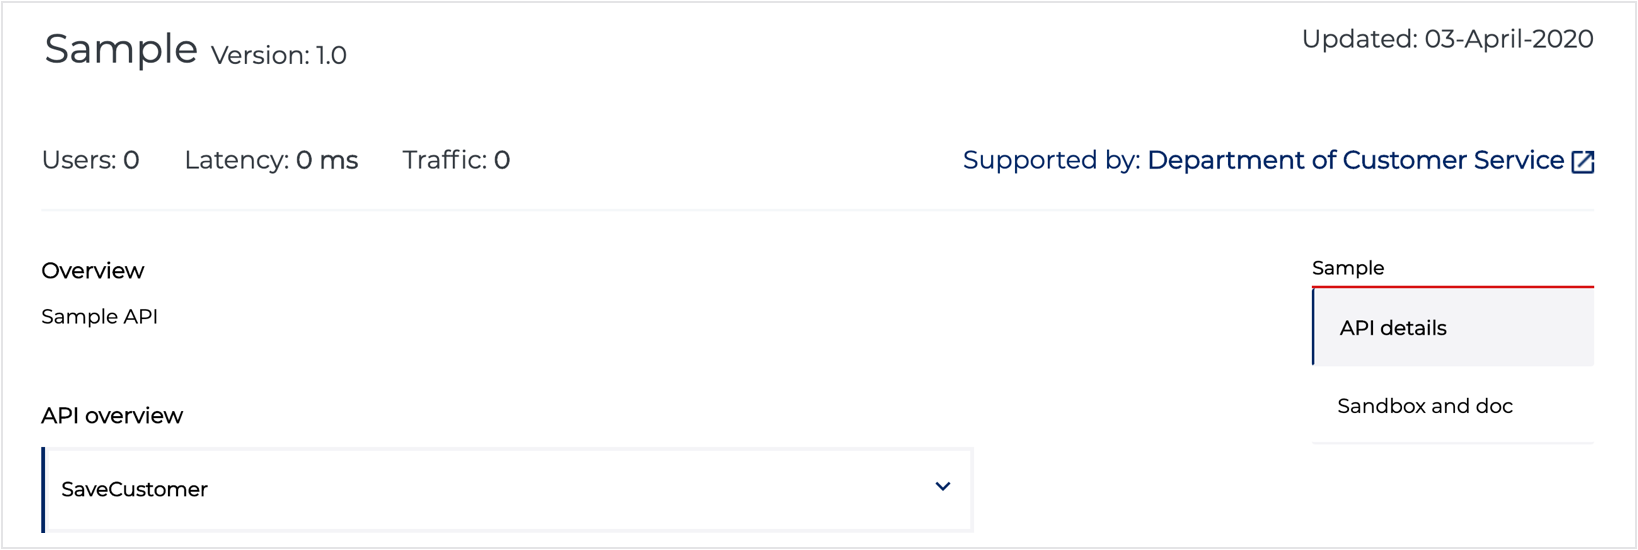
On this new page, you will see a side menu with ‘API details’ and ‘Sandbox and doc’.
API Details – Provides all relevant details related to the API. These details include analytics (number of users,
latency and traffic), brief description of the APIs purpose or function, endpoints available and their specific purpose or function
and generalised information regarding rate limits and security and authentication.
Sandbox and doc – Provides access to the swagger document associated with the API and includes code examples for
various programming languages. Also available is the ability to test each available endpoint.
These two pages will become visible to developers once you publish your API so its important to test and update these pages before ‘publishing an API’ to the public.
API Details
An API provider should ensure that all the details shown on the API details page is correct and clearly outlines their API. The sections to review are:
Overview - a brief description of the APIs purpose or intent. This is derived from the API description field
in the 'publish an API' application.
API Overview - should list all publicly accessible endpoints of the API, detailing their function and
type of HTTP method. This is derived from the endpoints created in the 'publish an API' application.
Sandbox and doc
You can access the sandbox and doc page by clicking on ‘Sandbox and doc’ link on the side menu when on an API details page. A publisher should ensure that all the information displayed from the swagger document is accurate. In addition, all endpoints must successfully execute and return expected payloads.
Test your API endpoints
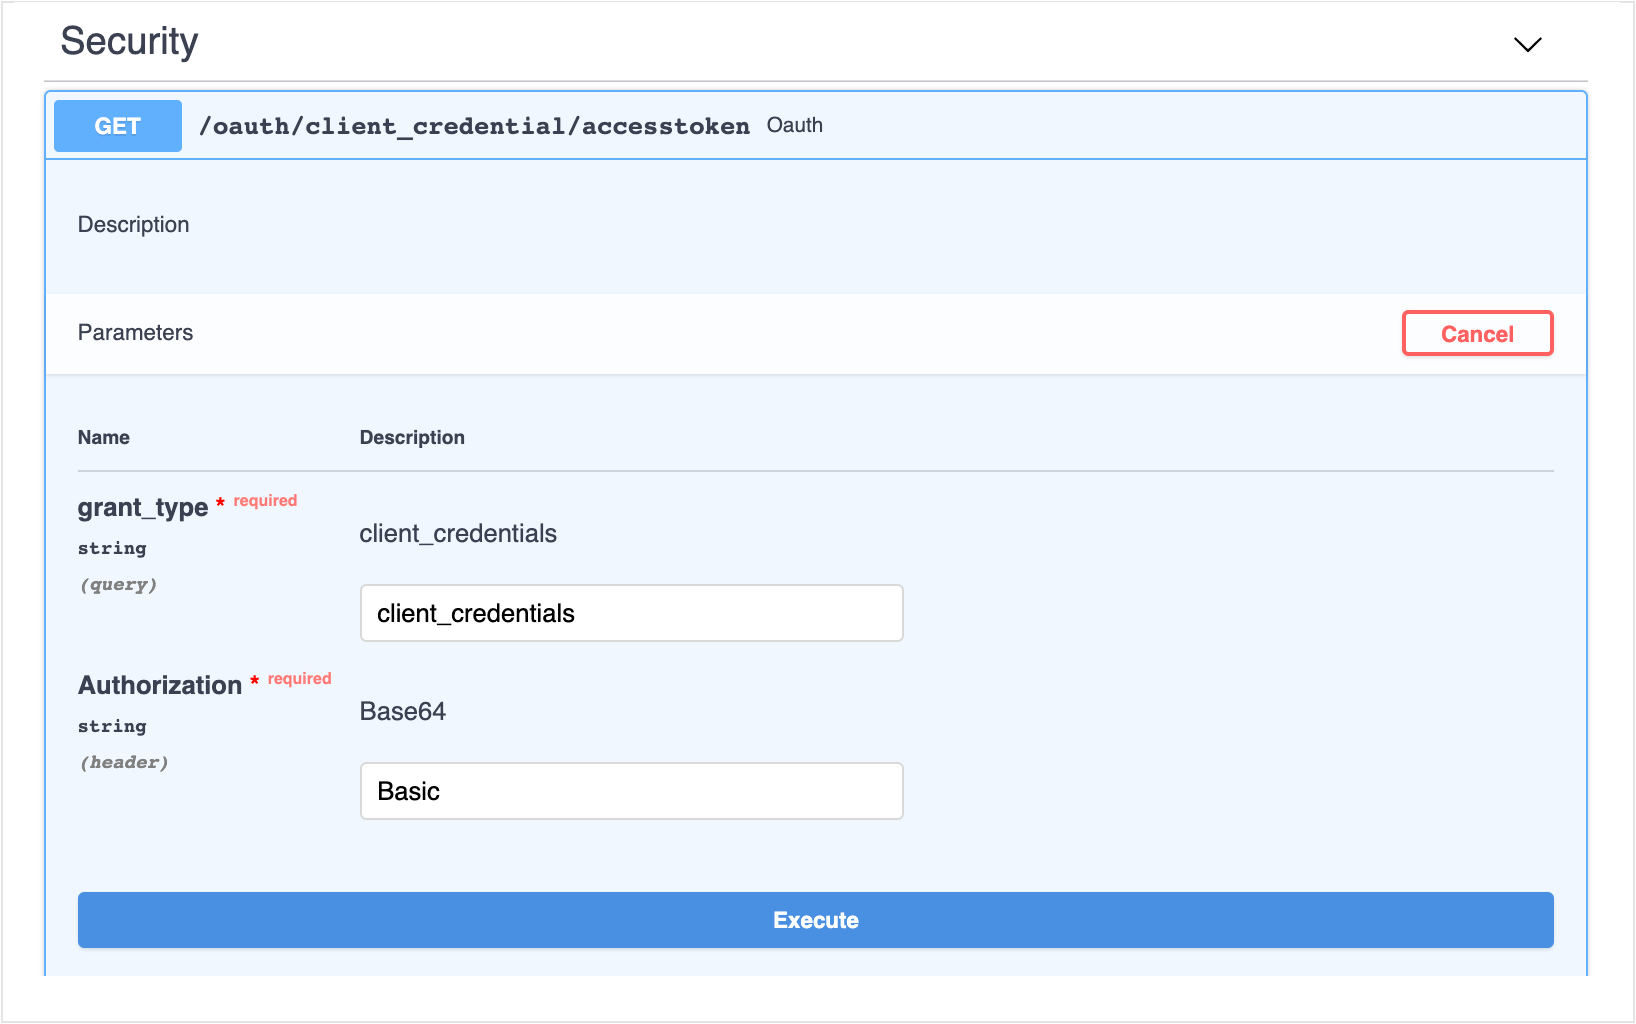
API endpoints require consumers to be authorised before interacting with them and therefore all swagger documents must have the following security endpoint added in order for consumers to obtain a valid access token.
In order for you to test and obtain a valid access token:
- Copy the Authorisation Header from your test app overview page.
- Navigate to your API on the 'Sandbox and doc' page.
- Click on the blue box under 'Security' to expand the view.
- Click on the 'Try it out' button to enable the parameters section of the standard security endpoint.
- Paste the 'Authorisation Header' into the 'Authorisation' parameters while leaving 'grant_type' as it is.
- Click on the 'Execute' button.
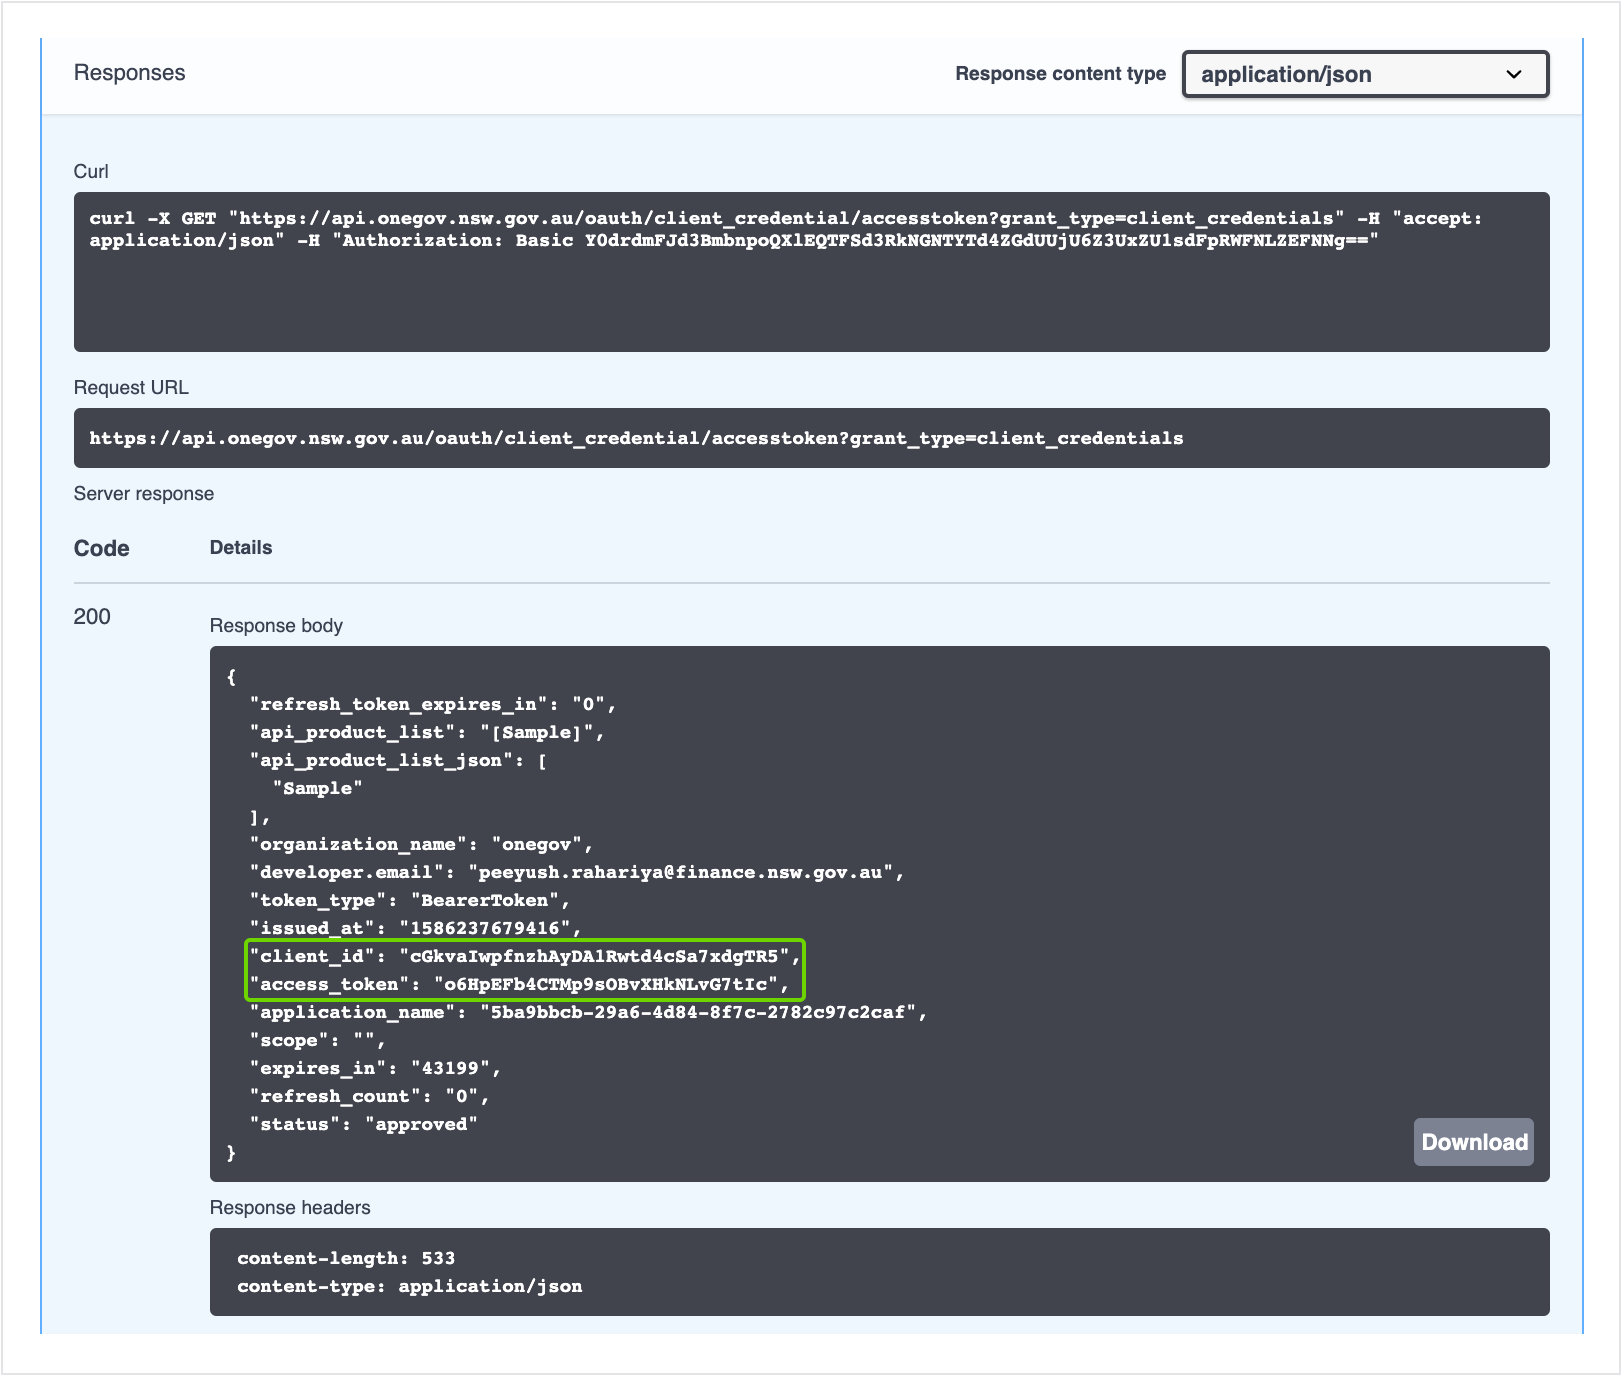
You can view the response data by scrolling down to the ‘Responses’ section. A response code of 200 is expected and two key fields should be noted in the response as they are required parameters for other endpoints provided under this secure API, these are:
- client_id - this is the apikey as shown in the API details page and is typically called apikey on other endpoints within this secure API.
- access_token - typically called Authorisation in other endpoints within this secure API.
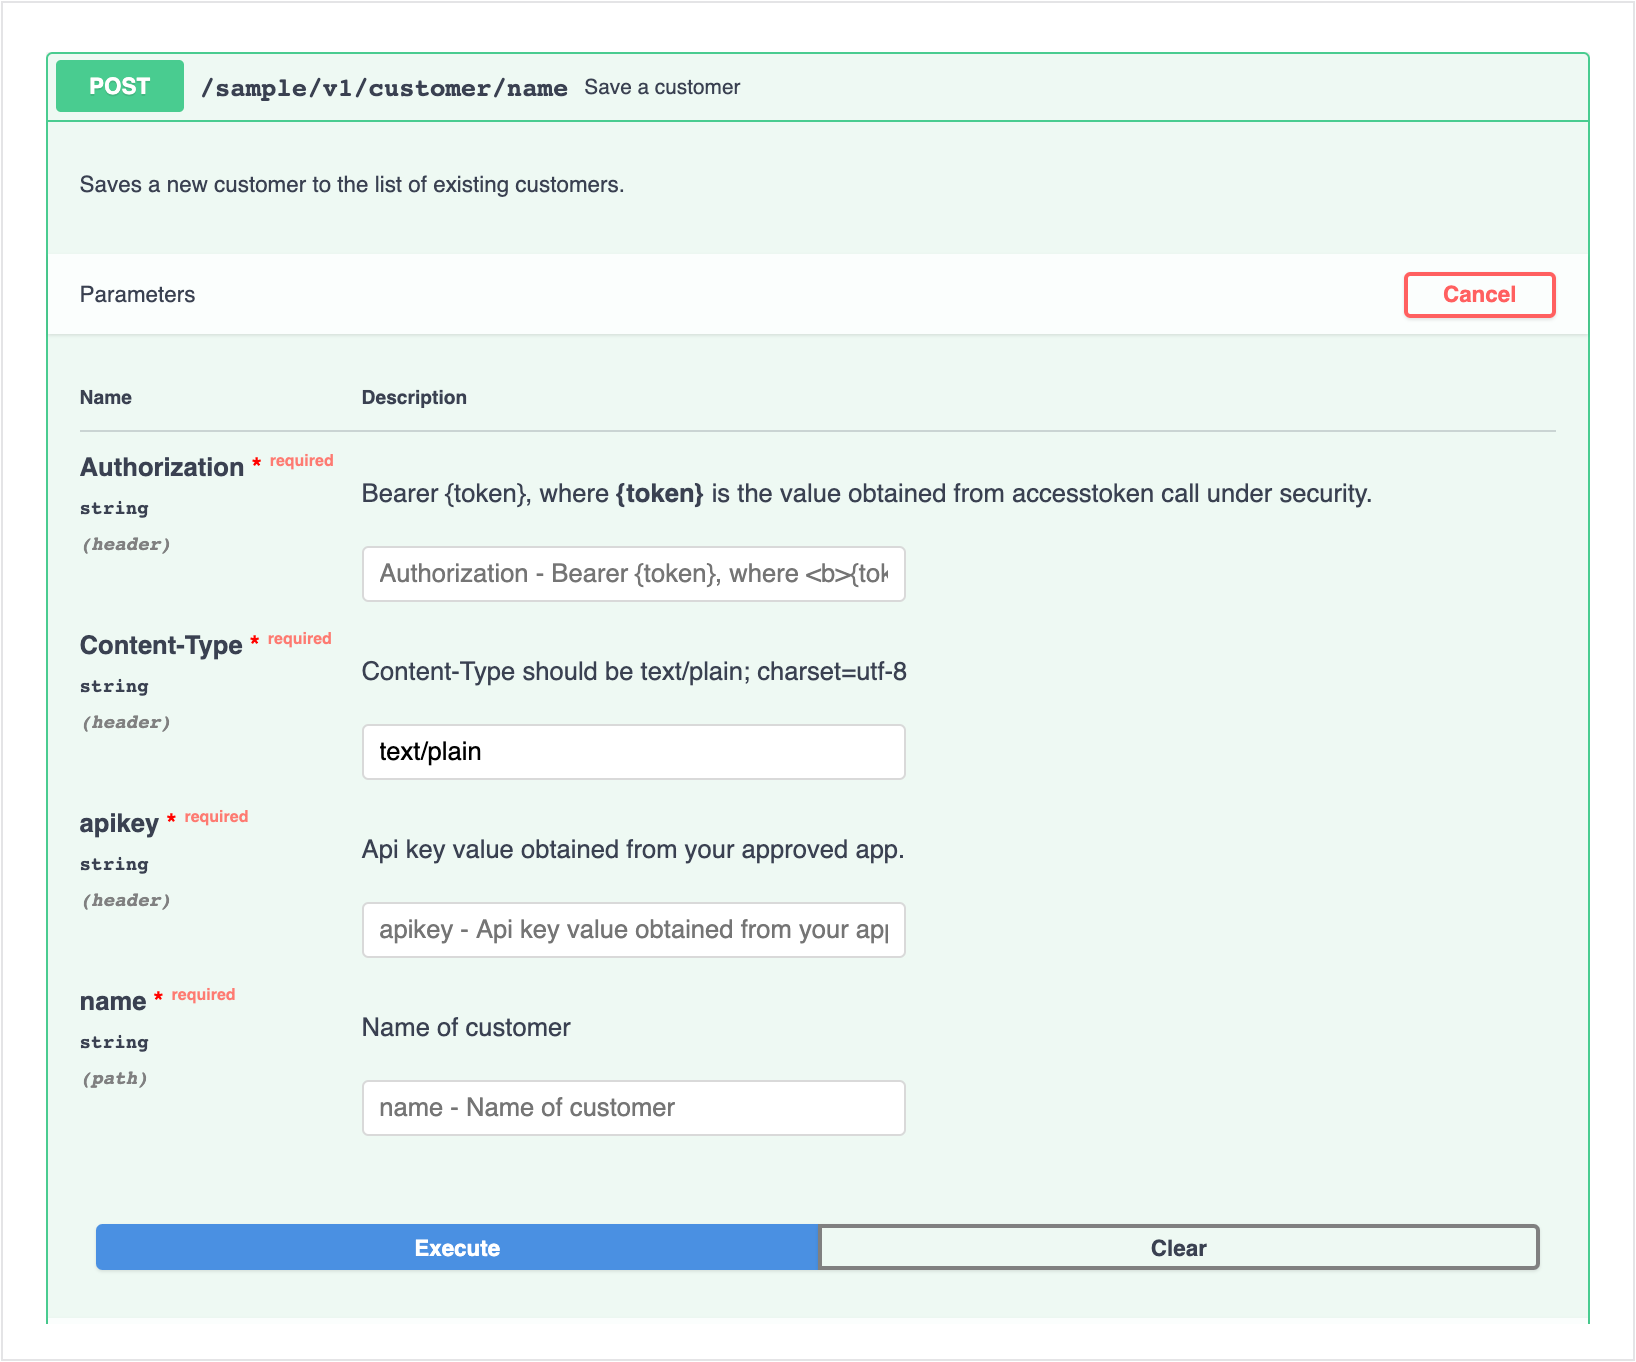
Now that an authorisation token has been granted, all other endpoints can be tested by providing both the client_id (apikey) and access_token with any other parameters.
You can test any additional endpoints:
- Click on any of the endpoints to expand the view.
- Click on the 'Try it out' button to enable the parameters section of the standard security endpoint.
- Copy and paste the access_token into the 'Authorisation' parameters with the format of Bearer (access_token)
- Copy and paste the client_id (apikey) into the 'apikey' parameter.
- Provide a name in the 'name' parameter.
- Click on the 'Execute' button.
Tested your API to make sure all aspects of it are working correctly before you publish your API for public use. You can request to become an API provider if you have requested yet.